-
Shop
- Advanced Technologies
- AI Skills
- Apple Accessories
- Armani
- Bathroom
- Best-Sellers
- Calvin Klein
- Car Accessories
- Car Buying & Ownership
- Confidence
- Dating & Social Skills
- Digital Resources
- AI & Technology
- Beauty
- Electronics & Technology
- Emotional Intelligence
- Home Styling & Organization
- Kitchen & Recipes
- Mindfulness
- Mindset
- Online Business
- Parenting & Child Development
- Personal Style & Fashion
- Pet Lifestyle & Wellness
- Positive Thinking
- Productivity
- Self Confidence
- Sleep Improvement
- Smart Life with AI
- Stress Management & Relaxation
- Wellness
- Yoga & Mind-Body Practices
- Education & Learning
- Family & Parenting
- Fashion
- Furniture
- Gadgets
- Health & Beauty
- Health & Wellness
- Home & Garden
- Home Decor
- Home Electronics
- Jewelry
- Kids & Babies
- Kitchen
- Legend Footwear Brands Collection
- Lighting
- Luxury Brands Collection
- Nike
- Patio, Lawn & Garden
- Personal Growth
- Pet Care
- Pet Supplies
- Pets
- Smart Amazon Shopping
- Sport & Outdoors
- Travel
- Travel & Adventure
- Wealth
- Wealth Building
- Budgeting & Saving
- Cryptocurrency Investing
- Debt Management
- Entrepreneurship & Business Growth
- Family Finance & Budgeting
- Financial Independence
- Financial Mindset & Psychology
- Financial Planning
- Frugal Living & Expense Hacks
- Goal Setting
- High-Income Skills
- Investing Basics
- Leadership
- Motivation
- Networking & Mentorship
- Passive Income Strategies
- Real Estate Investing
- Side Hustles
- Stock Market Investing
- Popular
- Best deals
Beginner Travel Vlogging Gear Checklist: Pack Light & Film
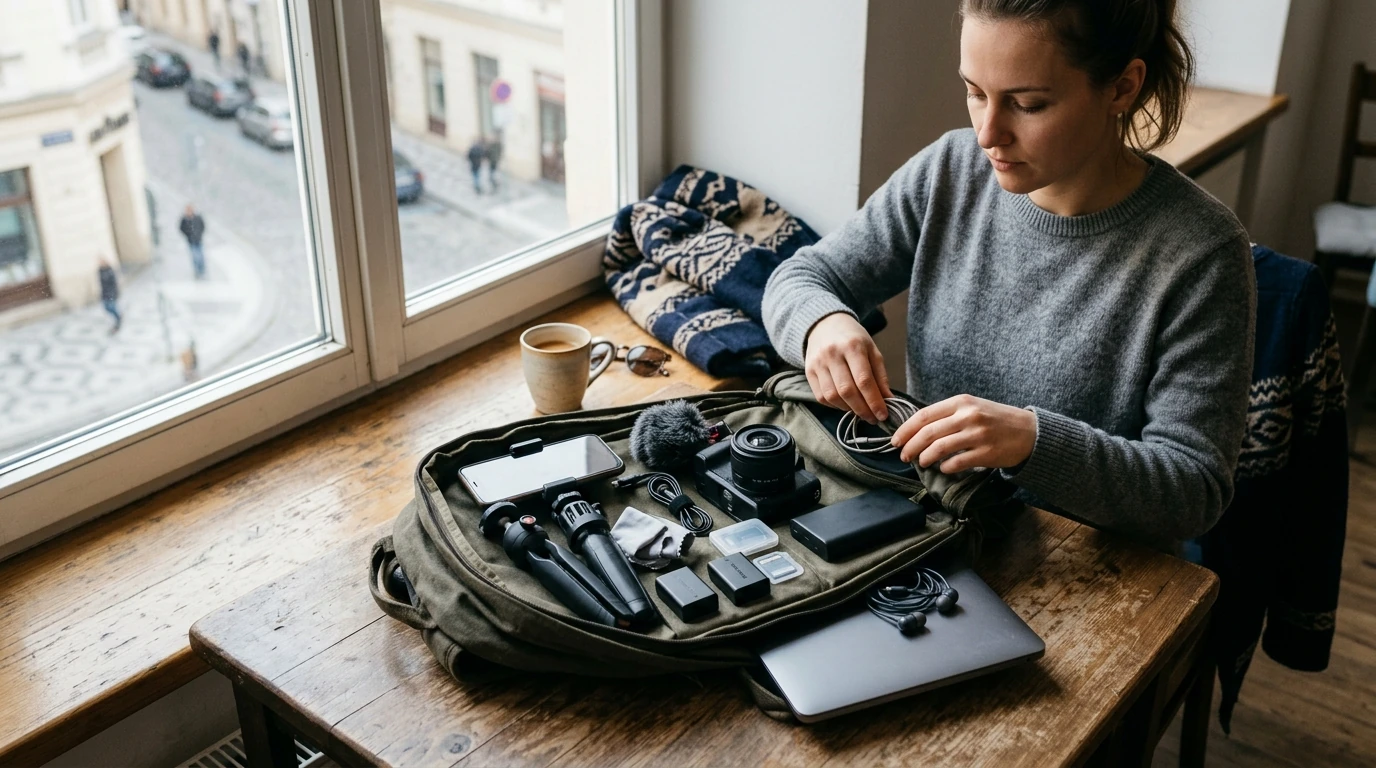
Travel Vlogging Gear Checklist for Beginners: Pack Smart, Film Steady, Publish Faster
A beginner-friendly travel vlogging setup doesn’t need to be expensive or complicated—it needs to be reliable, portable, and easy to use on the road. The goal is a small kit you’ll actually deploy: stable shots, clear audio, enough power to last the day, and a simple backup/edit flow that prevents “lost footage” disasters.
Start With the Three Priorities: Stability, Audio, and Battery Life
Most beginner travel vlog issues come from three problems: shaky footage, noisy environments, and dead batteries. Build your kit to solve those first, and you’ll improve watchability faster than chasing a new camera body.
- Stability: Plan for handheld walking shots, quick tabletop setups, and occasional time-lapses.
- Audio: Viewers will tolerate average video, but they click away from unclear sound.
- Battery life: Power for filming + transfers + navigation matters more than specs.
Aim for a grab-and-go kit you can set up in under two minutes for spontaneous moments. Duplicate only the small essentials (SD cards, cables, batteries), not major devices that add weight and stress.
Primary Camera Options (Phone, Action Cam, Compact, Mirrorless)
Your “best” camera is the one you’ll carry all day. Start simple, then upgrade when you know what you’re missing.
- Phone: Best convenience. Pair it with a small grip/tripod and an external mic for a major quality jump.
- Action camera: Ideal for water, motion, and wide shots. Plan wind reduction for outdoor audio.
- Compact camera: A balance of portability and quality. Check autofocus reliability and mic input.
- Mirrorless/DSLR: Strongest image and lens options, but needs more batteries, storage, and setup time.
Before buying, verify the non-negotiables: stabilization options, low-light performance, microphone input (or a tested workaround), and charging method. USB-C (and ideally USB-PD) is the easiest travel path.
Quick Gear Match: What to Use for Common Travel Vlog Scenarios
| Scenario | Best Starter Choice | Why It Works | One Add-On That Helps Most |
|---|---|---|---|
| Walking tour in a city | Phone or compact camera | Fast to pull out; good in daylight | Mini tripod/handgrip |
| Beach, boat, rain | Action camera | Durable; wide-angle captures action | Wind muff or external audio backup |
| Food markets and street scenes | Phone | Discreet; quick focus; easy sharing | Clip-on mic for dialogue |
| Night streets and indoor cafes | Compact or mirrorless | Better low-light and separation | Small LED light |
| Talking to camera (sit-down) | Phone/compact/mirrorless | Controlled framing and focus | Tripod + external mic |
Audio Gear That Makes Footage Feel Professional
If you buy one upgrade, make it audio. Start with a single dependable microphone choice and learn it well.
- Clip-on (lavalier): Great for voice clarity in busy streets or markets.
- Compact shotgun mic: Useful for run-and-gun when you can’t wire up.
- Wind protection: Foam windscreens help, but a “deadcat” style cover is the real outdoor saver.
- Adapters: Match your ports (USB-C, Lightning, 3.5mm) and test everything before departure.
Do a 10-second audio test in each new environment (quiet room, street, cafe) to catch buzzing, rubbing, or clipping. Keep a simple backup: a phone voice memo or a second small mic as a safety track.
Stabilization and Support: Tripods, Grips, and Mounts
A beginner doesn’t need a suitcase of support gear. Most travel vlogs are covered by two items: a mini tripod/handgrip and (optionally) a lightweight travel tripod.
- Mini tripod/handgrip: The everyday workhorse for walking, talking-to-camera, and quick tabletop shots.
- Lightweight travel tripod: Worth it for time-lapses, night shots, and solo framing.
- Gimbal (optional): Helpful if smooth walking footage is your core style and you’ll commit to balancing and charging.
- Action cam mounts: A small kit (clamp/adhesive/chest) adds flexibility without much bulk.
- Cleaning kit: Microfiber cloth + blower keeps lenses clear when weather turns.
Lighting for Travel: Small, Soft, and Chargeable
A pocket LED light can rescue hotel rooms, night markets, and indoor cafes—without turning your bag into a studio.
- Choose adjustable brightness and adjustable color temperature to match mixed lighting.
- Add a small diffuser (or soft attachment) to avoid harsh shadows on faces.
- Use natural light when possible: face a window and avoid bright backlight behind you.
Power, Charging, and Storage: The Travel-Proof Backbone
Power and storage are what keep you filming when the day runs long. Build redundancy here, not by carrying multiple big cameras.
Editing and Sharing Essentials (Minimal Setup That Still Works)
For platform and editing help, use official references like the YouTube Help Center, the iMovie User Guide, and Premiere Pro tutorials.
Printable Checklist: Build a Kit That Fits in One Bag
If you want a ready-to-print version that’s easy to check at the airport or hotel, see Travel Vlogging Gear Checklist for Beginners (Printable Digital Download).
And if editing on the road leaves you feeling fried, Screen Headaches Solved (digital guide for reducing eye strain during editing) can help you build screen habits that are easier to maintain during travel.
Common Beginner Mistakes to Avoid
FAQ
What’s the minimum travel vlogging gear needed to start?
A phone or camera, one external microphone, a small tripod/handgrip, a power bank with the right charging cable, and enough storage (SD cards or free phone space) plus a basic backup plan are enough to publish consistently.
Is a gimbal necessary for travel vlogging?
A gimbal helps most when smooth walking footage is central to your style. If you’re prioritizing speed and portability, a mini tripod/handgrip plus built-in stabilization is usually enough, with less weight and fewer charging demands.
How can footage be backed up while traveling?
Transfer footage daily to a portable SSD or laptop, then verify files open before reusing cards. Keep original cards as a temporary “physical backup,” and upload to the cloud when Wi‑Fi is reliable.
Recommended for you


Indoor Plant Placement: Best Spots by Light & Room
Sep 17, 2026











Leave a comment